

Increase your conversion ratios by improving your software setup. The installer of your software application is an integral part of your product. It is the first thing the user sees, and yet, it is often overlooked. First impressions matter, and more importantly, if installing your software isn’t as easy as possible, you are losing installs, potential customers and revenue.
When it comes to installers, what should you try to improve? The goals are to:
Basically, we are trying to maximize the successful install ratio, make a good impression, and utilize the opportunity to install shortcuts to your product and your website (without annoying the user, obviously!).
You can also use the setup (installer) as a sales tool in some cases. I will write more on that in the future.
Eliminating steps
Modern installers, like the Opera browser installer, have just 1 or 2 step. Chrome installer has zero steps – it asks you whether you want to make Chrome the default browser, and whether you agree to the EULA, before you download the actual setup file! When you run the setup file, no user interaction is required. It just installs and runs Chrome.
Majority of currently used setup creators, including Inno Setup and NSIS, are wizard-based. Unfortunately, most of these packages have far too many unnecessary steps.
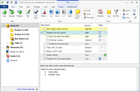
For example, the default steps in Inno setup installer are:
Making the user to go through 5 pages before the actual installation begins is usually completely unnecessary.
In an ideal world, there could be just one page with big Install button, and pre-checked checkbox “I agree with the EULA”. There should be a link to display the EULA. Optionally, the page can also contain “Advanced…” link/button that will display a small modal dialog that will allow the user to customize the destination folder, and possibly shortcuts. And that’s it! You don’t need anything else.
The installer of the Opera browser is a great example. Check it out at http://www.opera.com/download/ – it has just a single page, and is absolutely beautiful.
So, what you should do is to go through all steps of your installer, and eliminate everything that is not necessary.
Let me give you a couple of examples from Inno setup -
The “License” step of Inno Setup requires the user to click the “I agree” option button, and then click the “Next” button. You can simply remove the option buttons, and change the text of the “Next” button to “I Agree” in this step.
Please note: I am not a lawyer, and I am looking at this purely from the perspective of maximizing the number of successful installs. It is possible that making it “too easy” to accept the EULA can undermine its validity. Do your own research first.
Even the destination folder is sometimes unnecessary, and can be entirely skipped, especially when it comes to simple consumer apps and utilities.
Start Menu folder selection step is completely unnecessary, too.
“Ready To Install” step is useless. Get rid of it.
With a little effort, your refined wizard can be like this:
You can even remove the “Welcome” step, but you will probably want to make the “License Agreement” step look pretty, as the Welcome step usually displays some fancy graphics.
Making it easier and simpler
There are many things you can do. All general principles of user friendly design apply to installers as well. Some tips -
- If possible, don’t require elevated admin privileges in your installer. Many users are not running an admin account. This can be a big problem especially at their workplace, where they need to ask for permission the IT manager or boss. If your setup works even without the elevated privileges, it is a big win – you will most certainly get more installs. For example, Chrome installer doesn’t require elevated privileges and installs into the current user AppData\Local directory (this also allows automatic updates without elevated privileges).
- Eliminate all unnecessary text and controls. For example, Inno setup displays free disk space on the directory selection page, which is useless for majority of applications, because Windows display warning when the disk space is lower than a few hundred of MBs anyway, and your application is probably much smaller.
When building wizard-based installers:
- If possible, make the “Next” button large and prominent.
- Make sure that the “Next” button is selected (has focus) by default. So when someone just runs the installer and presses the spacebar key, he will always proceed to the next step of the installation.
- In many cases, you will discover that you can simply hide the “Back” button. How likely it is that someone will want to re-read that EULA?
Shortcuts and Internet Shortcuts (.url)
I recommend installing these shortcuts:
- Application shortcut on the desktop
- Application shortcut in the Quick Launch toolbar
- Application shortcut in the Start Menu
- Company website link in the Start Menu
- Purchase link in the Start Menu
- “Contact Us” link in the Start Menu
- Help file shortcut in the Start Menu
Other ideas include:
- Online FAQ/knowledge base link in the Start Menu
- Online forum link in the Start Menu
- Blog link in the Start Menu
- Facebook link in the Start Menu
- Twitter link in the Start Menu
All Start Menu links should be placed in a subfolder named after your application.
Definitely place a shortcut to your application on the user desktop. You don’t even need to ask the user in the installer. You can do the same for Quick Launch toolbar.
Avoid placing generic shortcuts to your website(s) on the desktop – having a shortcut named “Buy” placed on the user’s desktop is a big NO-NO.
All shortcuts created by the installer must be either placed in the proper subfolder of the Start Menu, or, contain the actual name of your software product, e.g. “Buy My Awesome App”, not just “Buy”.
Also, never place a shortcut “More Software from My Company” on the user’s desktop. As a rule of thumb, anything that could be considered an “ad” should be avoided. Feel free to go link-mad in the Start Menu folder of your application, but be careful when placing links to the user desktop.
Making a solid impression
I have three quick tips to offer here:
- Make sure that your installer is code signed. This is a must. Installer is by far the place where having a signed executable counts the most. You can get a code signing certificate from K Software for superb price, and Mitchell, a fellow mISV vendor, offers great support, too.
- Include an attractive graphics in the installer. Don’t settle for the default images. Ideally, get it made by a professional designer.
- Don’t change the default installer icon, or at least make sure that it looks like an actual installation icon. Using the same icon as your application has might seem like a good idea, but the installer icon shouldn’t be confusable with the icon of your actual application.
Conclusion
Simplifying the installation process and making your setup more polished and professional is an area that offers excellent ROI revenue-wise, especially if you have yet not touched your installer a lot.
Easier installation => more installs => more users => more customers. It’s really that simple.